Thursday, May 19, 2011

Great Miso Soup Ideas.

I find that I can simply just play around by changing different ingredients everytime and add a few tbsp of miso into the soup and the kids will never get bored with having the soup quite often. It all depends on what are the other dish that I am preparing for that meal. If I cook other dishes of seafood and meat, then  I will prepare what I have for dinner tonight as shown in the first picture below. If I have other vegetables dishes but not meat or fish, then I will prepare miso with some fishball or chicken fillet strips and so on. Just be creative and try new mehods.

The picture below is just miso with 1 box of soft silken toufu cubes, fresh chinese yam (huai shan) cubes, carrots also cut into cubes and dried seaweeds. For method of cooking, just refer to the fishball link above. Its the same. Just different ingredients used.


The other day, I prepare miso with ready ingredients available in my fridge on a lazy day. Its just some minced meat (marinate with light soy sauce, sesame oil and corn flour), 1 big carrot, 2 small potatoes, 1 corn on the cob (cut the flesh), a beaten egg and a stalk of shanghai green (cut thinly and add in lastly). My little one love it, so do the elder brother and sister because they love corn. This way, they get to eat their favourite corns easily together with the soup and don't get the flesh stuck to their teeth and without getting their hands dirty. The corns also adds some natural sweetness to the soup and it smells really nice!


Its just my way of experimenting with food. Just a way to make sure my kids have a balance diet of meat and vegetables.

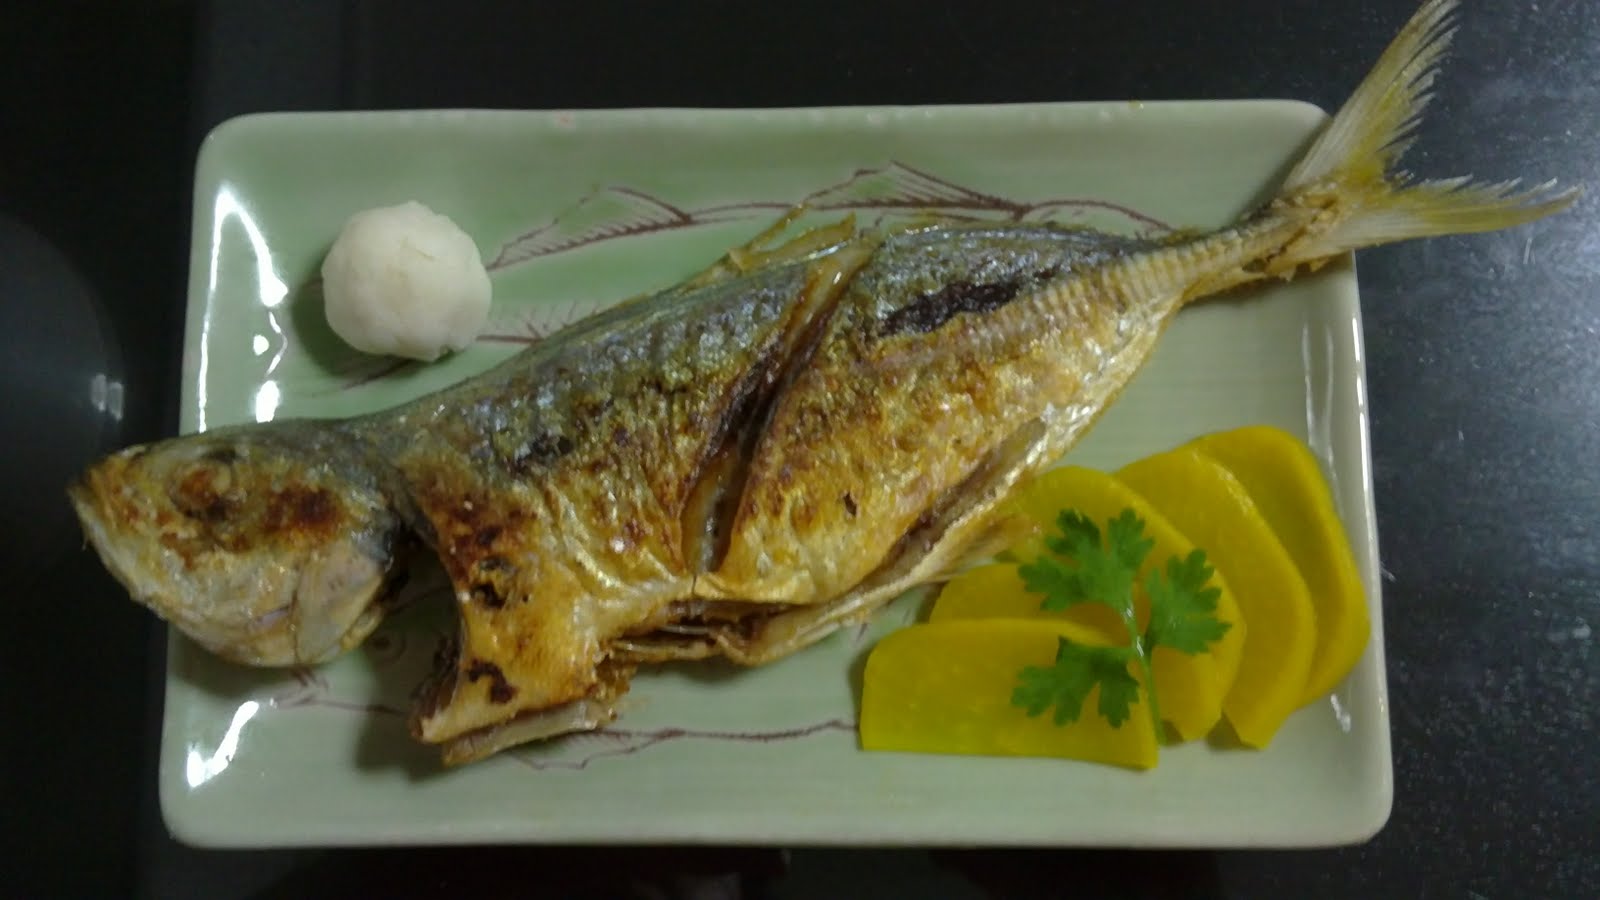
Pan-fried Mackerel(Ikan Selar) With Grated White Radish (Fresh Daikon)


Another simple to prepare dish.

The ingredients are:
2 fresh medium size Mackerel (Ikan Selar)
Salt
Corn flour
Fresh white radish
Slices of fresh lemon
Some light soy sauce

Cut, deskinned and grated about 10cm of fresh white radish. Place the grated radish in a fine sieve and put it briefly under running water. Then drain away the bitter juice. Shape it into a small ball and set aside.

Cleaned and pat dry the fresh mackerel with some kitchen towel. Marinate with some salt and set aside for an hour and wipe off with kitchen towel and lightly coat with some corn flour. Pat off excess flour. 

In a clean wok/pan, heat up some oil and make sure the surface of the wok/pan are coated with the oil. Fry in medium flames. Refrain from turning the fish too early to avoid tearing the skin. Just add more oil if the wok/pan gets too dry. Turn to the other side and fry til brown and crispy. This method is good and uses less oil. Just make sure the fish is dry to avoid the oil from spattering all over the stove area. Once done, squeeze some lemon juice over the fish before serving. Decorate the dish with the grated radish ball and a few slices of pickled daikon.

Add  the grated radish with some soy sauce for dipping.

Prepared some miso soup and sambal sotong too for dinner tonight.  

Enjoy!


Tuesday, May 17, 2011

I love cupcakes!


I was browsing through my picture folders when I found some of the nice cupcakes pictures that I have make before. I just want to share with everybody some of the nice pictures that I have here.

Simple Baked Cheese Cake


Been feeling rather lazy to bake because of the hot weather recently. I am craving for cheese cake today and yet eversince I know how to bake, I really don't feel like buying from the shop. I was searching around until I found this great and simple recipe. Its easy to bake the cake because the ingredients are so simple and easy to find.

Everything falls in place nicely today. After sending Vance to his kindergarten, I reached home and put the packet of Sunshine garlic bread to bake in the oven at 170 C. I just want to save time and at the same time, preheat the oven to the required temperature. Then I start to prepare the required ingredients for the cake that I am going to bake today. I had prepared the biscuits crust base a day earlier and let it set in the fridge. When I am done mixing all the ingredients and pour it into the crust to bake together in the oven, its time for me to take out the garlic bread toast to enjoy with my cup of strong espresso with fresh milk while the cake is baking. Then its time to prepare for lunch before going out to fetch the little monster home again. All in just 3 hrs time.

The recipe is as below.

Ingredients :
(Biscuit base)
Digestive biscuit (5pcs)
Melted butter (20g)

* Crust all the biscuits  and mixed well with the butter before pressing it firmly on a lined 15cm removable cake tin. Put it back to the fridge to let it set (can be done one day in advance).


(Cheese cream paste)
Philadelphia cream cheese 8oz (1pkt)
Sour cream (30g)
Castor sugar (60g)
2 eggs (beaten)
Fresh cream (100ml)

In a clean bowl, use a whisk to beat the cream cheese (put under room temperature to soften in advance, so that its easier to mash) and lightly mashed till creamy. Add in the sour cream and sugar and mix well till the sugar disolved and well blended. Then slowly add in the beaten egg, a little at a time and make sure its well blended in with the cream everytime. 

Lastly, add in the fresh cream slowly in two portion, making sure each portion is mixed well into the cream. Mix it until the texture is creamy and thick. Pour into the biscuit crust in the baking tin and put to bake at 170C preheat oven for 1hr or till the surface is brown and well expanded.

I should have taken the picture of the freshly baked cheese cake. Its very nice and high but once cooled, it is normal for the cheese cake to shrink to the size you see in the pictures above. Once is cooled, put it into the refrigerator to chill for one day before serving. Haha... usually its impossible because everyone will be asking when they can eat and I always let it chill for only an hour or 2 and before long, the whole cake will be gone.

Before serving, I decorated the top with some extra cream cheese icing and a fresh strawberry. It is simply delicious. Isnt it easy to prepare? Hope everyone can give it a try and tell me if you love it. We do! Enjoy!



Monday, May 2, 2011

Pork Luncheon Meat Fried Rice with XO Sauce.

I had purposely reserved half portion of the pork luncheon meat I used for last night's dish for what I am going to prepare for lunch today. I had also prepared more rice last night.(Overnight rice are used for fried rice because in this way, the rice won't turn out too sticky and affect the taste of the dish.) Crack 2 eggs into the cold overnight plain rice and mix well. This is to give the plain rice a nice yellow colour and of course, the rice will taste better too.

Simply cut the pork luncheon meat into smaller cubes and prepare one or two diced onion. Then prepare some minced garlic. Of course you may add in some finely chopped red chillies and green spring onion (I have run out of those in my fridge today) to make the dish more colourful and appetizing.
Simply prepare these 3 ingredients. (half portion of the pork luncheon meat cut into smaller cubes, 2 medium size onion diced and some minced garlic)

Crack in 2  eggs and mix it well with the cold overnight plain rice.

XO Sauce - its a fabulous sauce that will surely enhance the taste of the fried rice.


Now, heat up some oil, throw in the minced garlic and fry till frangrance. Crack in  a beaten egg and let it set slightly before mashing it up and add in the pork luncheon meat and onions. Stir fry till the pork luncheon meat are brown and crisp. Its now ready to add in the plain rice coated with eggs. Add in 3 tbsp of the XO sauce. Keep folding and mix well and season with some white pepper powder and a little bit of light soy sauce just to enhance the flavor. Don't put too much light soy sauce or the fried rice will turn out too salty because the XO sauce and the pork luncheon meat are already salty. Keep folding and press with the spatula, making sure the rice is nicely browned and fluffy.


Yummy fried rice with pork luncheon meat, XO sauce and fried egg.


I always like to prepare some fried eggs to go with the fried rice. Topped with some homemade dried shrimp sambal.Yummm....

Sunday, May 1, 2011

Special Baked Bean Meal.


Its another lazy Sunday. I decided to prepare a quick all in one dish that has been the kids' all time favourite.

Prepare the ingredients as shown in the first 2 pictures and we are ready for tonight's dinner.

Firstly, heat up some oil and fry the diced carrot and potatoes till light brown. Remove from the wok. Next, fry the diced pork luncheon meat and set aside. Add some oil and fry the garlic till frangrance. Then add in the minced meat(can be replaced with fresh prawns) and chopped onion. Toss in the carrot and potatoes and  diced luncheon meat together with the can of light baked bean.
Use the empty can to measure the amount of hot water (1can) and pour it into the wok. Stir and mix well. Season with some Maggi tomato & chilli sauce, a dash of the Lea & Perkin sauce and some oyster sauce. Then add in a pinch of sugar and some sesame oil.
Let it simmer in low flame for 15mins or till the potatoes and carrots are soften. Turn off the fire and fold in the beaten egg. Lastly, add in the chopped green spring onion and its ready.

Serve with piping hot fragrant rice.  


Fried Vermicelli Noodles


Fried egg chopped coarsely.

Fried Glass Vermicelli Noodles

Prepare the simple ingredients as shown in the first and second pictures above. Soften some dried glass vermicelli noodles in water, drained and set aside.

Heat up some oil in a wok. Stir fry the sliced shallots and minced garlic until frangrance, follow by the carrots and mushrooms. Add more oil if its too dry, keep frying for awhile then add in the chicken meats. Stir-fry till the meat turns white and add in the glass noodles. Season with some light soy sauce and fish sauce. Add some dark soy sauce to give the glass noodles a deeper brown. Lastly add in the coarsely chopped fried eggs sheets, chinese parsley and green spring onion strips and mixed well. (Slowly mix all the ingredients and seasoning well under low heat because the glass noodles will get to stick on the wok easily if the heat is too high)

Serve hot. Enjoy!